


This site's SSL certificate provides multiple brands and types of certificates. For details, please refer to the difference between each certificate. This document describes how to purchase and select an SSL certificate for this site.
Before purchasing and applying for a certificate, please understand the certificate application process so that you can obtain an SSL certificate faster. The relevant process is shown in Figure 1, and the specific description is shown in Table 1.
Figure 1 SSL certificate application process

Table 1 Description of the certificate application process
|
Step |
Application process |
Illustrate |
|
1 |
Buy SSL certificate |
In the SSL certificate management platform, purchase the corresponding certificate according to your domain name type |
|
2 |
Apply for an SSL certificate |
After successfully purchasing a certificate, you need to bind a domain name to the certificate, fill in the details of the certificate applicant, and submit it for review. |
|
3 |
Domain verification |
According to the regulations of CA Center, after submitting the certificate application, you need to cooperate with the completion of domain name authorization verification to prove your ownership of the bound domain name you are applying for. The following verification methods are provided: Manual DNS verification: optional for all types of certificates. File verification: Wildcard can only use manual DNS verification, others can use file verification. |
|
4 |
Organization Verification (Optional) |
This operation is required only when applying for OV and EV type certificates. After the domain name verification is completed, the CA agency needs to confirm whether the enterprise/organization has initiated the certificate order application. |
|
5 |
Issuing a certificate |
After the organization verification is completed, it will take some time for the CA agency to process, please be patient. For the specific application time, please refer to the application time for each certificate. After the CA agency has passed the review, the certificate will be issued. After the certificate is issued, it takes effect immediately, and the certificate can be downloaded and deployed on the server for use. |
Step 1: Purchase an SSL Certificate
This task guides users on how to purchase an SSL certificate, including selecting the type, brand, and purchase amount of the certificate.
Precautions:
Special enterprises do not support applying for OV and EV certificates. For example: the military, some special agencies of the government, state secret units, etc.
Steps:
1. Log in to this site;
2. Click "SSL Certificate" to enter the SSL certificate single page;
3. Click "Buy Now" to enter the purchase certificate page;
On the certificate purchase page, select "Price Range", "Certificate Type", "Certificate Brand", "Domain Name Type", and "Number of Domain Names", as shown in Figure 1.
Figure 1 Service selection
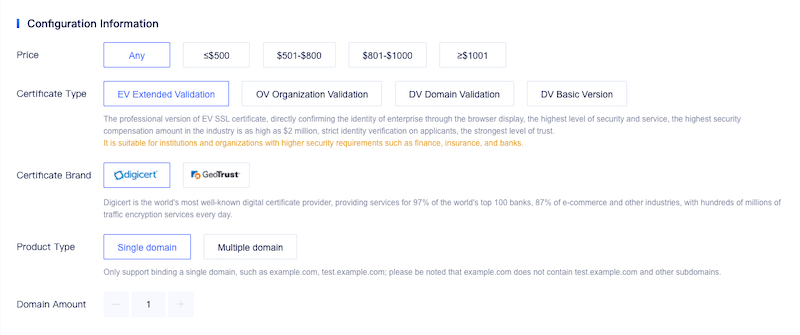
a. Select "Price Range":
Please choose the appropriate price range according to your needs.
b. Select "Certificate Type":
The types of certificates provided and their differences are shown in Table 1, please choose according to your needs.
Table 1 Certificate Types
|
Certificate type |
Application scenarios |
Authentication Strength |
Review cycle |
|
EV Enhanced |
Platform websites, APP applications, applets, etc. suitable for large government enterprises / e-commerce / education / Finance / banking / medical and other industries |
Strictly verify the authenticity of organizations and enterprises and domain name ownership |
3 to 5 working days |
|
OV Enterprise |
Websites, APP applications, small programs, etc. for small and medium-sized enterprises |
Verify organizational and business authenticity and domain ownership |
1 to 3 working days |
|
DV domain name type, DV basic version |
Suitable for personal website, enterprise testing |
Easy verification of domain ownership |
Fast issuance within hours |
|
·For more information on the differences between certificate types, see Differences Between Certificates. |
|||
c. Select "Certificate Brand":
Currently supported brands include "GeoTrust", "DigiCert", "GlobalSign", "Sectigo". For the difference between certificate types, see Differences Between Certificate Brands.
d. Select "Domain Type":
Domain name type, supports "single domain name", "multiple domain name" and "wildcard". The specific parameter description is shown in Table 2.
Table 2 Domain Name Types
|
Parameter Name |
Parameter Description |
|
Single Domain Name |
That is, a single SSL certificate only supports binding to one single domain name. For example, example.com |
|
Multiple Domains |
That is, a single SSL certificate can be bound to multiple domain names at the same time. The number of bindings varies depending on the brand, and can support up to 250 domain names. |
|
Wildcard |
That is, a single SSL certificate supports binding a wildcard. *.*.example.com multiple wildcards are not supported. Wildcards only allow adding a wildcard domain name, such as *.example.com (including a.example.com, b.example.com, ..., but not a.a.example.com). |
| For more information on how to choose a domain name type, see How to choose a domain name type. | |
e. Set "Number of Domain Names":
* When "Single Domain Name" and "Wildcard" are selected for "Domain Type", the number of domain names is limited to 1.
* When "Multiple Domain Names" is selected for "Domain Name Type", the number of domain names ranges from "2 to 250" (the number of domain names varies with different brands). The number of domain names must meet the following conditions:
* The number of primary domain names is fixed at 1
* The number of additional single domain names ≥ 1 (the number of additional single domain names the number of additional generic domain names ≥ 1)
Figure 2 Domain Name Type

f. Select "Validity Period": the default is 1 year.
The validity period of the certificate is calculated from the time when the certificate is finally issued. After the certificate expires, you need to re-purchase and complete the certificate application process.
4. After confirming that the parameter configuration is correct, click "Buy Now" (or add to "Shopping Cart").
5. After confirming that the order is correct, read and check "I have read and agree to the Certificate Service Agreement", and click "Confirm Settlement".
6. On the purchase page, please select a payment method to make payment.
After successful payment, on the SSL certificate management interface, you can view the purchased certificate in the certificate list.
Follow-up:
After successfully purchasing an SSL certificate, please refer to Apply for a Certificate to bind a domain name to the certificate, and fill in the details of the certificate applicant.
Step 2: Apply for an SSL certificate
After successfully purchasing a certificate, you need to apply for a certificate, that is, bind a domain name to the certificate, fill in the details of the certificate applicant, and submit it for review. The certificate authority will issue the certificate only after all the information has been reviewed.
Precautions:
The status of the certificate is "pending application".
Steps:
1. Log in to the management center of this site;
2. Select "SSL Certificate > Certificate Management" to enter the certificate management interface.
3. On the SSL certificate page, click "Certificate Application" in the "Operation" column of the row where the certificate to be applied for, the system will pop up the certificate application details page from the right.
4. In the pop-up certificate application details page, fill in the domain name information.
a.CSR generation
The certificate request file (Certificate Signing Request, CSR) is the certificate signing application, which contains your server information and company information. When applying for a certificate, you need to submit the CSR file of your certificate to the CA certification center for review.
Select the certificate CSR generation method:
* The system generates a CSR (recommended): The system will automatically generate the private key of the certificate for you, and you need to save the key to avoid loss.
* Generate CSR yourself: Manually generate the CSR file and copy the file content into the CSR file content dialog. For details, see How to Create a CSR File? .
b. Bind the domain name
* When "System Generate CSR" is selected for "Certificate Request File", you need to manually enter the domain name that the certificate needs to be bound to.
①.Single domain name
Fill in a domain name that needs to be bound.
For example, if you need to bind the domain name to example.com, then fill in as shown in the following figure:

②.Multiple domains
The main domain name and additional domain name need to be bound.
For example, if you need to bind the domain names to example.com, test.example.com and *.example.com, fill in as shown in the following figure:
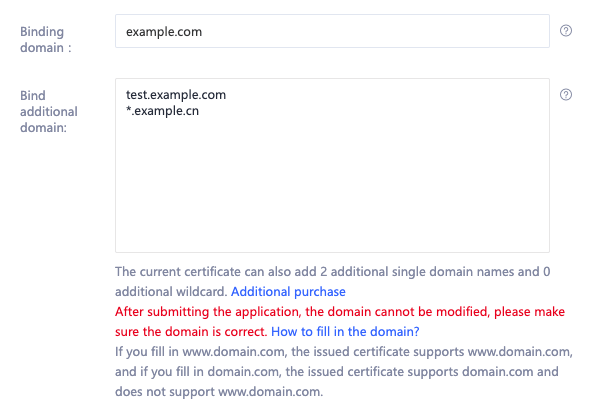
illustrate:
* Additional domain name must be greater than or equal to 1. Additional domain names can be entered in batches. For details, see Adding Additional Domain Names.
* Please enter multiple additional domain names in a new line.
* If you purchase a combined certificate (single domain name wildcard), the main domain name only supports binding a single domain name.
* The relationship between the main domain name and the additional domain name (master-slave relationship) has no effect on the added domain name.
③.wildcard
Fill in 1 wildcard that needs to be bound.
For example, if the domain name needs to be bound to *.example.com, fill in as shown below:

c. Domain name verification method
According to the regulations of CA Center, if you apply for a digital certificate, you must cooperate with the verification of domain name authorization to prove your ownership of the domain name you are applying for binding. After you correctly configure the domain name verification information as required, and after the domain name authorization verification is completed and the CA system center has passed the verification, the certificate verification can enter the next state.
Table 2 Domain name verification methods
|
Ways of identifying |
illustrate |
Conditions of Use and Restrictions |
|
DNS verification (manual DNS verification) |
It means that you need to manually modify the DNS resolution record of the domain name at the DNS resolution service provider of the domain name, and add a TXT or CNAME type record for verification to the resolution record. |
You have the authority to modify the DNS resolution settings of the domain name (that is, have the authority to manage the domain name). |
|
Document verification |
It means that you manually obtain the certificate verification file from the file verification information, and then create the specified file in the Web directory of the server. |
* You have permission to write content to the root directory of the server where the website is located (ie, have server management permissions). * The server opens ports 80 and 443, and supports monitoring HTTP and HTTPS access. Notice Currently, CAs only support authentication requests to ports 80 and 443. If your server does not open ports 80 and 443, do not use file authentication. |
5. Click "Organization Management", click "New Organization" to pop up a pop-up box, and fill in the organization management information.
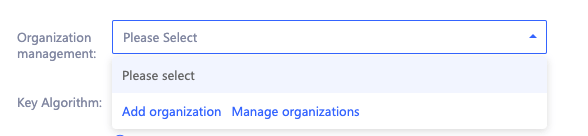
a. (Optional) For OV and EV certificates, you need to fill in the enterprise organization information. Please fill in the information according to the interface prompts.
illustrate:
* Please fill in the full name of the company registered with the business license for the company name
* Bank account opening certificate and business license are optional.
& If you need to upload the business license, please upload the local business registration certificate (in mainland China, please upload the business license).
& The size of the uploaded file is limited to less than 2MB, the format must be png or jpg, and only one file can be uploaded.
& Failure to upload will prolong the issuance cycle of the certificate. The specific extension time depends on the verification time of the CA agency. In order to avoid prolonging the issuance period of the certificate, it is recommended that you upload the file.
6. After confirming that the information filled in is correct, click "Next" to verify the domain name verification method according to the prompts on the page.
Follow-up:
After submitting the certificate application, you need to verify the domain name authorization. According to the regulations of CA Center, if you apply for an SSL certificate, you must cooperate with the completion of domain name verification to prove your ownership of the domain name you are applying for binding.
Step 3: Domain Name Verification
Overview:
After submitting the certificate application, you need to verify the domain name authorization. According to the regulations of CA Center, if you apply for an SSL certificate, you must cooperate with the completion of domain name verification to prove your ownership of the domain name you are applying for binding.
After you correctly configure the domain name verification information as required, and after the domain name authorization verification is completed and the CA system center has passed the verification, the certificate verification can enter the next state.
The SSL certificate management on this site provides the following 2 methods, which are operated according to the verification method you selected when applying for the certificate:
|
Ways of identifying |
illustrate |
|
DNS verification (manual DNS verification) |
Refers to your TXT or CNAME type record. |
|
Document verification |
It means that you manually obtain the certificate verification file from the file verification information, and then create the specified file in the Web directory of the server. |
Method 1: Manual DNS Verification
According to the specifications of the CA Center, if you apply for an SSL certificate, you must complete domain name verification (also known as verifying domain name ownership) to prove that the domain name to be bound to the certificate to be applied belongs to you.
Manual DNS verification means that you need to manually modify the DNS resolution record of the domain name at the DNS resolution service provider of the domain name, and add a TXT or CNAME type record for verification to the resolution record. The CA agency verifies that the TXT or CNAME record can be parsed, which means that the verification is passed.
If you select manual DNS verification for domain name verification when applying for a certificate, please refer to this chapter for handling.
Precautions
Domain name resolution for manual DNS verification can only be performed on your domain name management platform. The specific resolution method is subject to the resolution method provided by the domain name service provider.
Get verification information
1. Log in to the management center of this site;
2. Select "SSL Certificate > Certificate Management > Click "Certificate Application" to fill in the certificate application information, and select the verification method: DNS verification (recommended).
Click "Next" to get the verification information.
If you have submitted the certificate application materials, click "Domain Name Verification" to obtain verification.
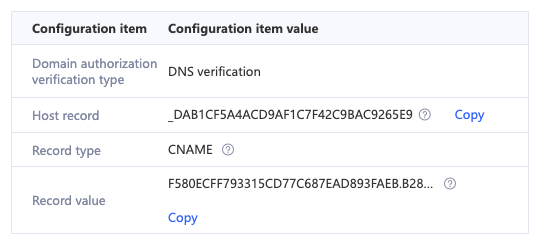
3. On the domain name verification page of the certificate, view and record the "Host Record", "Record Type" and "Record Value", as shown in Figure 1.
Figure 1 View host records
Perform DNS verification on the resolution service of this site
1. Log in to the management center of this site;
2. Select "Domain Name Management > My Domain Name > Click "Resolve" in the binding domain name operation to enter the domain name resolution page of the domain name bound to the certificate, click "Add" to open the bound domain name add resolution pop-up box, and enter the corresponding value;
Figure 2 Domain name resolution
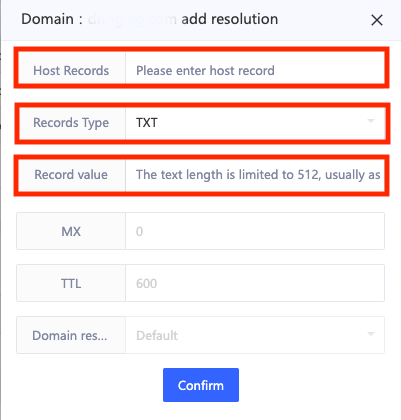
Table 1 Description of domain name resolution parameters
|
Parameter Name |
Parameter Description |
|
Host Record |
The "Domain Name Verification" page of the certificate, the "host record" returned by this site. Different certificate brands return different host records. Please keep the records consistent. |
|
Record Type |
Fill in according to the returned data. |
|
Record Value |
On the "Domain Name Verification" page of the certificate, the "record value" returned by this site. It is recommended to click directly to copy and paste the record value |
|
Other settings remain unchanged. |
|
3. Click "OK", the domain name is added and resolved successfully
When the resolution status is displayed as "Normal", it means that the domain name resolution is added successfully.
illustrate:
The resolution record can be deleted after the certificate is issued (the same record type host record can only have one record value).
4. If the DNS verification configuration does not take effect, please eliminate and modify according to the following possible reasons until the verification takes effect.
a.log configuration error.
Please check whether the "Host Record" or "Type" are filled in correctly.
b.The effective time of the configuration is too long, and the effective time has not yet expired, so the data cannot be queried.
Please check the effective time (TTL) of this site is 10 minutes by default. If the configured effective time has not expired, please wait until the time expires before verifying.
Method 2: Document Verification
According to the specifications of the CA Center, if you apply for an SSL certificate, you must complete domain name verification (also known as verifying domain name ownership) to prove that the domain name to be bound to the certificate to be applied belongs to you.
File verification means that you manually obtain the certificate verification file from the file verification information, and then create the specified file in the Web directory of the server. The CA agency verifies that the file path can be accessed, which means that the verification is passed.
If you selected file verification as the domain name verification method when applying for a certificate, please refer to this chapter for handling.
Get verification information
①. Log in to the management center of this site;
②. Select "SSL Certificate > Certificate Management > Click "Certificate Application" to fill in the certificate application information, and select the verification method: file verification. Click "Next" to obtain the verification information.
If you have submitted the certificate application materials, click "Domain Name Verification" to obtain verification.
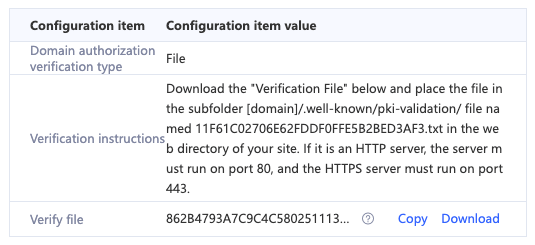
4. On the domain name verification page of the certificate, you can directly view the file verification instructions, as shown in Figure 1.
Figure 1 File Verification
①. Log in to your server, and make sure that the domain name is pointed to the server and the corresponding website is enabled normally.
②. Then create the specified file in the web directory of the server. The file includes the file directory, file name, and file content.
illustrate
The website root directory refers to the folder where you store the website programs on the server. There are roughly the following names: wwwroot, htdocs, public_html, webroot, etc. Please operate according to the actual situation.
Take the root directory of the website as "/www/htdocs" as an example to illustrate:
a. In the website root directory, create a ".well-known/pki-validation" subdirectory.
Here, it is created under the "/www/htdocs" directory, please operate according to the actual situation.
b. In the ".well-known/pki-validation" subdirectory, create a file named "fileauth.txt".
c. Copy the recorded values from the authentication file in the "fileauth.txt" file.
You can use the wget -S URL address command to detect whether there is a jump in the verification URL address.
Step 4: (OV, EV) Organization Verification
When applying for OV and EV type certificates, after the domain name verification is completed, the CA agency will send an organization verification email to the email address you filled in. The CA agency will contact the enterprise/organization according to the verification method you selected to confirm whether the enterprise/organization initiated the certificate order application.
Precautions
* If you purchase a certificate of the same brand again within 13 months and the information has not changed, it will be exempted from organization verification, that is, manual review.
* The status of the certificate is "pending verification".
* The following situations need to complete the organization verification, the certificate can be issued successfully:
Purchase OV and EV certificates for the first time.
It has been more than 13 months since the last certificate purchase.
It has not been more than 13 months since the last purchase of the certificate, but the contact information, company information or certificate brand has changed since the last purchase.
Steps:
1. Please log in to the contact email address you filled in when applying for the certificate.
2. Open the organization verification email from the CA agency.
3. Reply to the email from the CA organization to select the organization verification method.
Organizational verification includes phone, email
If you need to change the organization verification method, please reply directly to the email from the CA Center.
4. Please pay attention to the verification method you choose and cooperate with the CA agency to handle it.
For example, if the organization verification method you choose is phone verification, the CA agency will contact you through the public phone number of the enterprise/organization, please pay attention and deal with it in time.
Step 5: Issue an SSL certificate
The SSL certificate audit time depends on the cooperation between you and the CA. The CA agency will contact you through the email address and phone number reserved by you. Please pay attention to the email address and phone number you reserved when applying for the certificate.
* After confirming that the DNS verification is completed and the verification result is correct, please wait patiently for the DV-type certificate. It will take some time for the CA agency to process it. After the CA agency has passed the review, the certificate will be issued.
* After the OV and EV type certificates are confirmed to be verified by the organization, the CA agency will take some time to process, please wait patiently. After the CA agency has passed the review, the certificate will be issued.
Different SSL certificate types have different audit cycles. In general, the audit cycle descriptions for each certificate type are shown in Table 1.
Table 1 Certificate audit cycle
|
Certificate type |
Review cycle |
|
EV |
CA institutions manually review information In the case of correct information, the review cycle is generally 3 to 5 working days |
|
OV |
CA institutions manually review information In the case of correct information, the review cycle is generally 1 to 3 working days |
|
DV |
No manual review The CA agency issuance system automatically checks the domain name authorization configuration, and can be quickly issued within a few hours if the DNS configuration is correct. |
Steps:
After the CA agency has passed the review, the certificate will be issued, and the certificate will take effect immediately after the certificate is issued.
After the certificate is issued, the certificate can be downloaded and deployed on the server for use.
For details on how to download a certificate, see Downloading a Certificate.


支持以下地区货币结算:
AlipayHK (中国香港) : 支持 HKD 结算
TNG eWallet (马来西亚) : 支持 MYR 结算
Boost (马来西亚) : 支持 MYR 结算
GCash Pay (菲律宾) : 支持 PHP 结算
Billease (菲律宾) : 支持 PHP 结算
BPI (菲律宾) : 支持 PHP 结算
DANA Pay (印度尼西亚) : 支持 IDR 结算
Kredivo (印度尼西亚) : 支持 IDR 结算
TrueMoney (泰国) : 支持 THB 结算
Rabbit LINE Pay (泰国) : 支持 THB 结算
K PLUS (泰国) : 支持 THB 结算")